Using AWS CodeBuild to set up Github Continuous Integration
One of the most important aspects of a good pipeline for a development cycle is to remove / automate a lot of the legwork that comes with modifying the code base that you are working on. At the beginning with a small team and a small codebase having a “oh yeah, before we open a PR we should run the linter and check the tests all pass” as a general rule is a good first step.
But we’ve all been in bigger teams and seen how those things can quickly unravel. In a previous position I was one member of one of three teams that spanned multiple continents. Some of my colleagues weren’t as thorough as others, and would regularly miss out on code coverage, lint fixes and general tidiness. I would wager having continuous integration set up to automatically kick the pull requests back with a “nope, hasn’t met the standards needed, try again” saved me at least a couple of hours a day.
I’ve (relatively!) recently started working on a project hosted and ran on AWS. I’m loving playing with all the different bits and pieces, and today I worked out how to set up a CI pipeline in AWS to hook into our Github repo. The application was created initially using Create React App (way back at the start) — I mention this because I had to set an environment variable to work the tests out of watch mode (but we’ll get there)
I’m writing this post in the hope of encouraging people to use CodeBuild to set up a Continuous Integration pipeline with a quick step by step guide (assuming you have an AWS account, and a Github hosted application).
Lets jump straight in!
Defining our new project — Source and hook
There are a lot of pieces of the puzzle to define before we can get the build project up and running. First log into the AWS console and navigate to CodeBuild > BuildProjects and you should see something similar to the below (you may or may not already have builds set up). Select Create build project and you can start your new build configuration.

You will be taken to the below (as of writing — but this may change as Amazon updates it’s tools. A few guides I found were out of date!) Give your Project a name (must be unique for the AWS account) and a description to help describe it. If you haven’t already you will need to provide AWS with a Github access token to allow AWS and Github to communicate with one another. Once you can access the repo that is needed select Repository in my Github account and select your repo. Note we have also given the branch develop to allow the build to be branch specific.


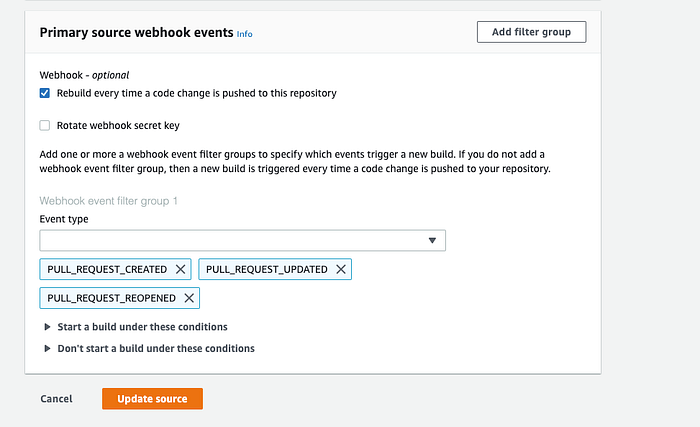
Note: for the next step you will need admin privileges in the Github repo you are connecting (to set up hooks). I would recommend asking the administrator of the repo to provide you admin privileges until you know everything is set up correctly, if you don’t have those privileges already.
Within the Primary source webhook events select Rebuild every time a code change is pushed to this repository. We have selected for the webhook to trigger a new build on create, update or reopen a PR for the branch in question.
Defining our new Project — Environment / Build spec / logs
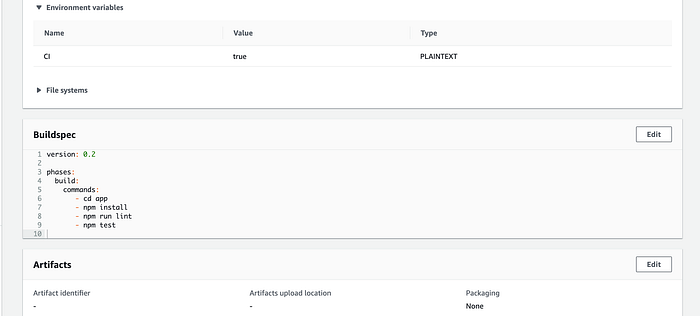
Once we have defined these, specify the operating system to be Amazon Linux 2. Eventually you may want to update the image to be a Custom Image using your own Docker image (this helps a lot for deployment, but for now we are leaving it as a Managed Image and focussing on Integration). Where there is an option to use a New service role or and Existing service role select for a new role and give it a unique, sensible name for the role. If you run e.g. npm test and are automatically in watch mode — as happens in Create-react-app you will have to expand the Additional configuration and create an Environment variable CI: true (as below) — this overrides the running of the application tests to work without being in watch mode:


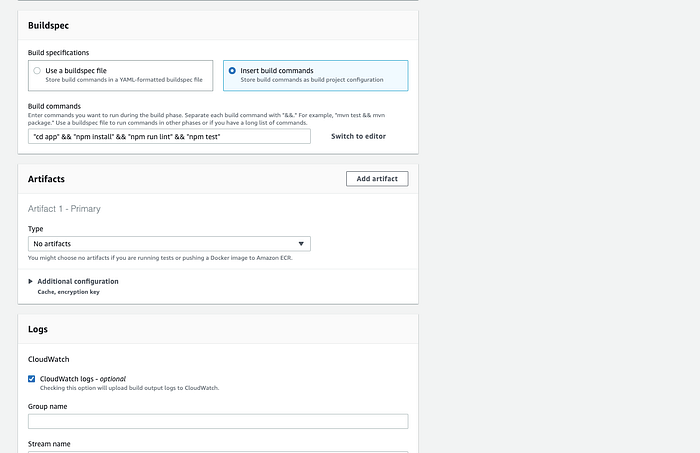
With the build spec you can add a YAML file to your repo if you want to set up a bunch of different rules, commands and actions, but for ease at first we define them inline, using this command:
cd app && npm install && npm run lint && npm testwhat this does is navigates into the UI section of the repo, installs the packages and then lints and tests the code (if you have a different command you run for linting and testing you should put them here).
Note: The recommendation is to put the command inline as I have in the screenshot below, but the code doesn’t compile and run correctly until you then manually remove the quotations. Once the project is built, you can open it, find the buildspec, and tweak it to look like it does in the second screenshot.
You can now hit Create build project and your project will be saved to your account.
If you want to you can force a build of your branch by selecting the build and then selecting Start build.
The build will begin to run and the logs will show you the progress.
Integrating with Github
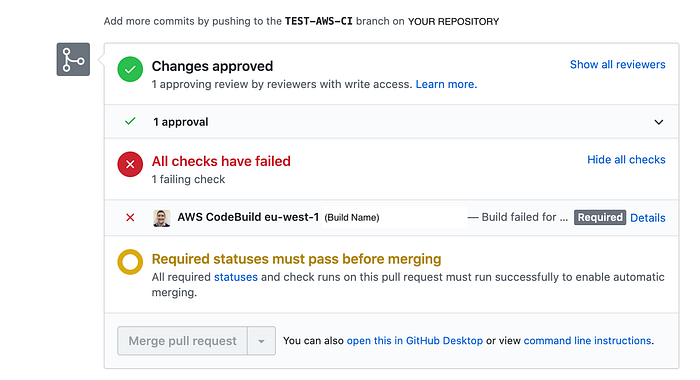
If you have set up the hook as specified above and then navigate to your Github repo, the status of the build should automatically be shown on any PR that is raised to merge into develop. The final step is to make sure that we block merging if any of the front end linter or tests fail. For this you still need admin privileges to be able to access the settings section of the repo.
Navigate into Settings and select branches. In the screenshots we already have our rules set up to restrict merging unless a PR is raised and approved by at least one author with write access for master and develop. We are now going to update the develop rule to also need the status of the AWS build to be pass.
Select to Edit the develop rule.

Then in the options select Require status checks to pass before merging, the new AWS CodeBuild that we created should be there as option (the name we assigned it will be in brackets to be sure we have the correct one). Tick the option.

Now when we run a PR, if the build fails, then we are blocked by Github and cannot merge into our protected branch.
Huzzah! We have Continuous integration, in the space of an afternoon!
Next steps?
My plan is to continue to look into CodeBuild. Our application has a complicated back end and DB structure in AWS already, and we currently use manual deployment which takes a few developer hours. I’m hoping to be able to leverage some more of the AWS power to streamline and automate this. Stay tuned!
